Ever wanted to get into vector art, but kept finding it way too difficult? Well do I have the somewhat practical solution for you!
~• What the f#ck is a vector?! •~
To put it simply, There are two ways to draw digitally:
>The usual way
[With pixels (AKA: Rasters)]
>The vector way
[...With vectors]
Your usual digital drawings are quick and snappy to draw and manipulate, but you can't easily make your drawing bigger without making it blurry.
Vectors on the other hand are made up entirely of dots and lines. Essentially making them one big complicated "connect the dots" game for the computer where it draws along the lines and fills in the middle. Meaning you can make these images as big as you want, and it'll never look blurry.
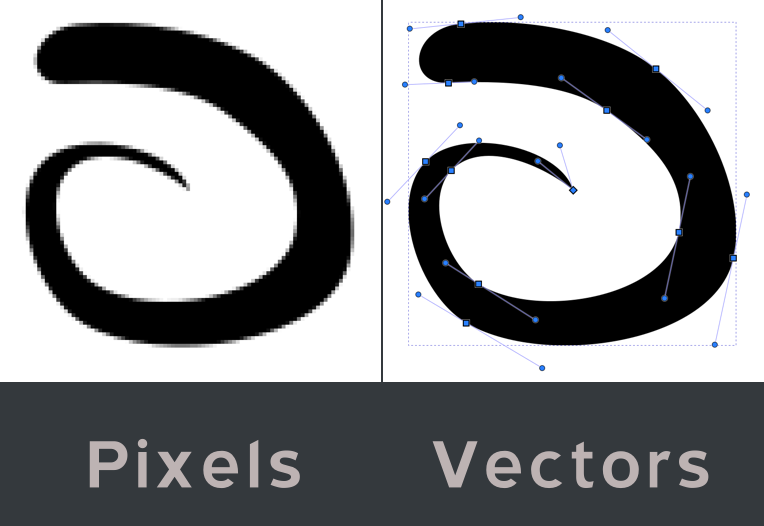
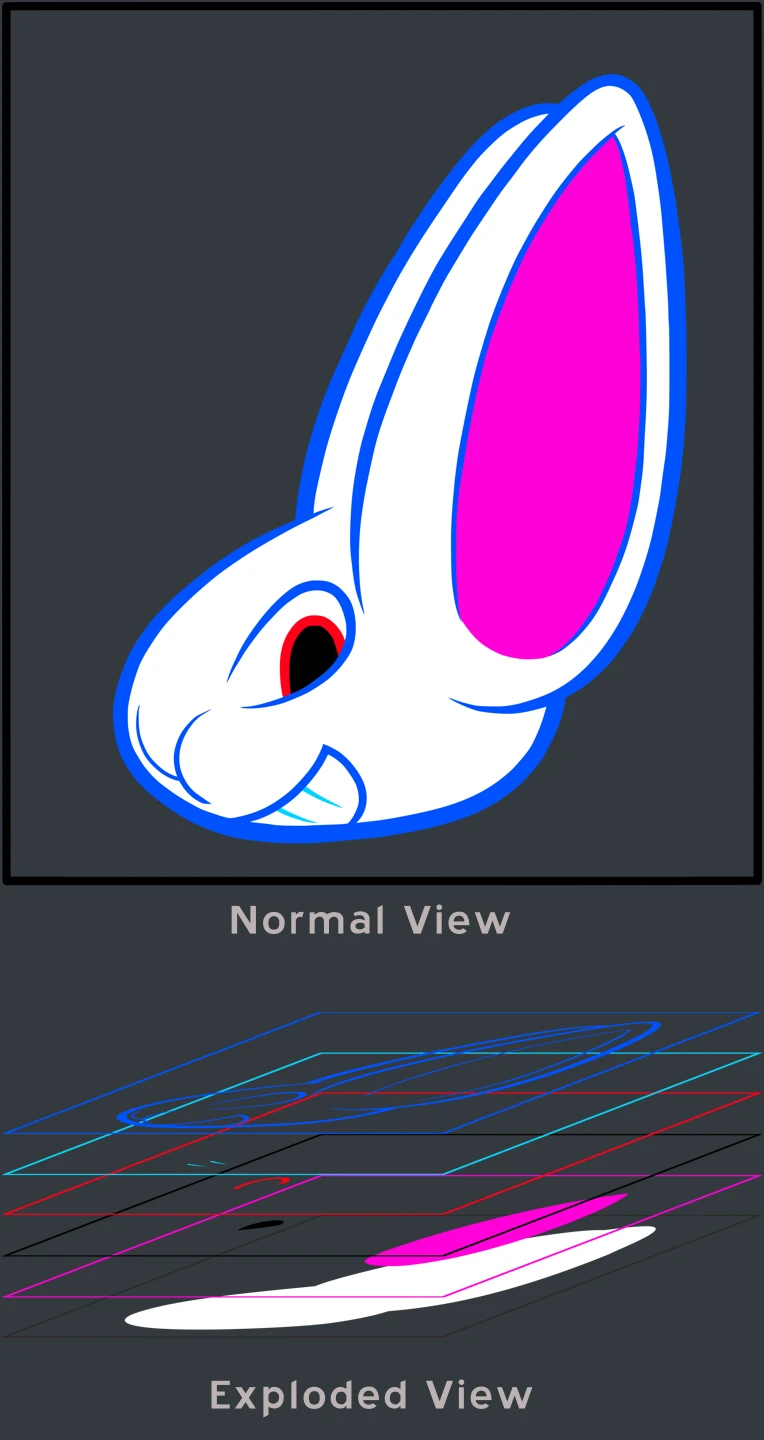
[Here you see the two methods to draw in play. Same drawing, just different ways to draw it]
However, Vector art's greatest strength is also it's greatest weakness. Placing these dots and lines manually can be a real pain, and it's super hard to add realistic details like you can with the usual digital drawing.
~• Do I need to use vectors? •~
If you're a casual artist, no.
However, if your style is simple enough, and you want to create merch with your drawing pasted onto it, or print a physical comic then learning how to use vectors is a strong recommendation. Mainly because you don't need to make a bunch of calculations with your canvas resolution.
Now that this is out of the way it's time to start the tutorial.
In this tutorial I will show you how to make some basic vector art while mostly using your usual digital tools. Combining the best of both in a way.
»»What you need:
>Krita
[Other art programs work, but Krita has the tools needed to easily convert to vector]
[At worst just use your preferred drawing app, and import the file to Krita]
>Vectorizer
[A tool I coded myself that does all the magic]
>Inkscape
[Or any other vector editor. That's just the one I use]
>Windows
[I have a Linux version, but I don't want to extend this tutorial any longer, and most people use Windows anyway]
+->Section 0
+----->Installing the Vectorizer
I'm pretty sure most of you already know how to install programs on Windows, but since I created the Vectorizer I'll briefly explain how to install it in case you missed the included documentation:
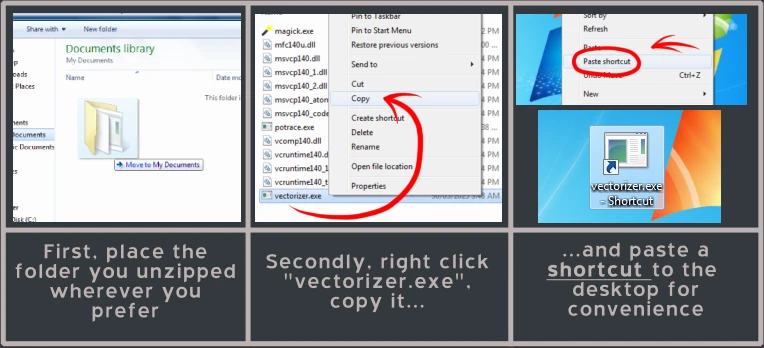
And that's it. Pretty simple stuff.
+->Section 1
+----->Preparing the drawing
This part is pretty easy, just open-up Krita and start drawing.
But before you do! You have to keep this in mind while you draw:
Keep your colours in separate layers!
Vectors use shapes, and each shape can either be a single colour or a gradient.
[There's more to it, but those are the basics]
You're basically trying to mimic how a vector editor organises everything using your usual digital paint brush.
It sounds strange, but I swear this is much easier than doing it all in Inkscape.
My recommendation is to use groups to...well group these layers together by character, background, or environment objects. Like so:
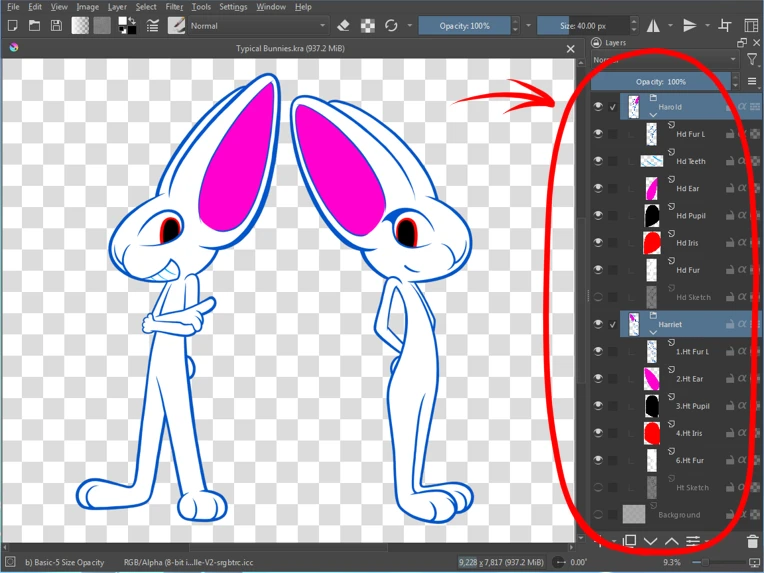
With the amount of layers you need to keep track of when making a vector project, it can get really messy, really quickly.
Organisation is key!
+->Section 2
+----->Converting to vector
Once you're done drawing something it's now time to convert it all to vector using my not patented, but still really cool Vectorizer!
...Unfortunately it's a little barebones, and relies entirely on a Krita script that extracts every layer and group to make it work (one which has a 10,000x10,000 pixel cap for some reason).
[This is something I want to break away from in the next version of this tool]
Before we start, make sure all the layers you don't want converted are hidden! You'll see why in a moment.
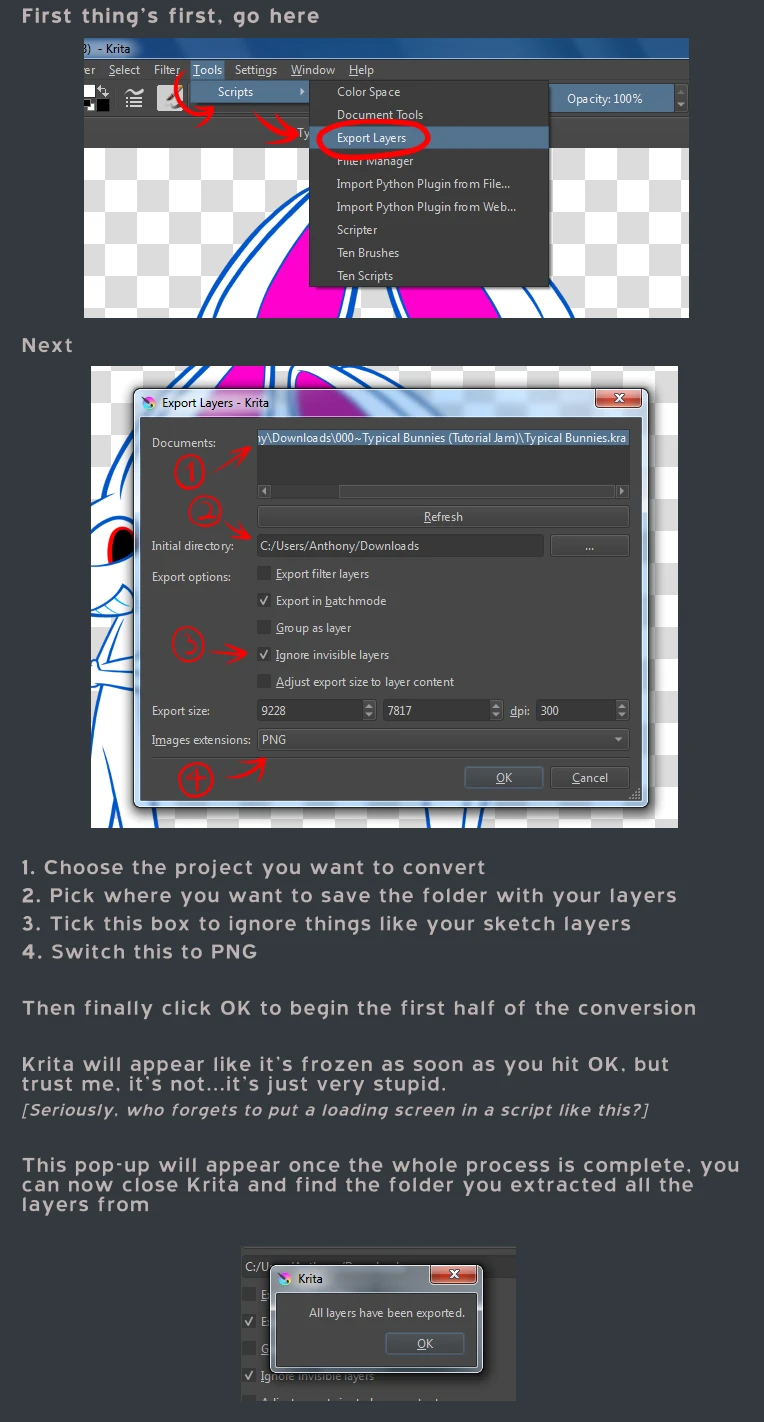
Now all you need to do is drag the newly created folder with all your PNG layers to the Vectorizer shortcut.

It'll do all the heavy lifting of converting and combining everything in that folder into a complete vector file (AKA: a ".SVG" file) that many vector editors can use.
+->Section 3
+----->Cleaning-up the vectors
Now that the Vectorizer spat-out the vector file it's time to clean-up the file in a vector editor. Because the Vectorizer is really messy with the conversion process.
[It's still technically a prototype]
The first thing you'll notice is everything is black, and the reason why is because the Vectoriser can't see what colour every layer has [still need to figure-out that part], so colouring has to be redone.
The second thing you'll notice is the layers are all scrambled...that one's my fault. The Vectorizer is supposed to sort alphabetically, but it does it in reverse order instead. The next release will fix that
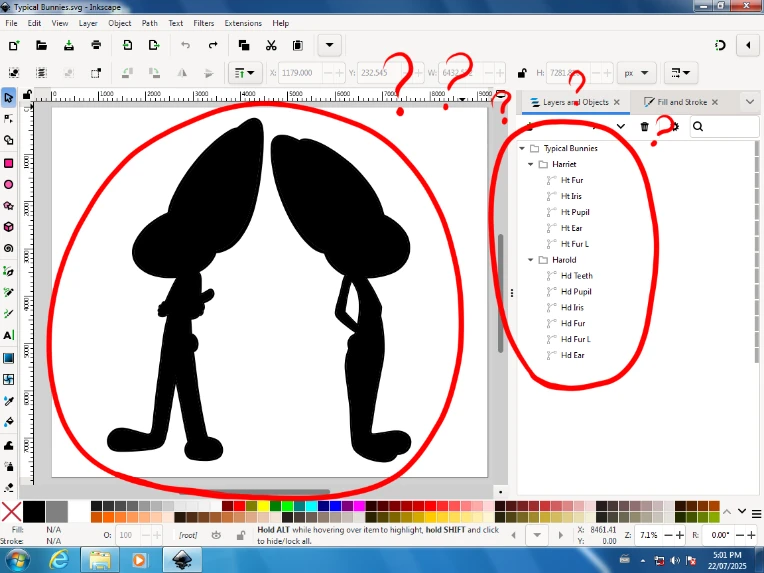
[There's a helpful tip in the documentation to help keep the same order (Harriet's layers uses it), you just need to do it in reverse]
Thankfully, both of these are really simple fixes:
Now that your drawing is coloured and organised again, it's time for the optional stuff that I usually do with my vector drawings: cleaning-up the shapes, and adding the shading.
If you're not interested you can stop here, you've already learned more than enough, and you've practically made a full Vector drawing without even fully scratching the surface.
Though, if the vector stuff interests you I highly recommend that you continue reading so you can learn the bare minimum of Inkscape.
+->Section 4
+----->Editing the vectors (optional)
Cleaning-up the shape can be the most tedious of the bunch. Even I don't do it to every shape I converted, but it helps keep the filesize down...not by much we're talking about going from 50KB to 30KB but it just makes it feel cleaner. You'll see why in a bit.
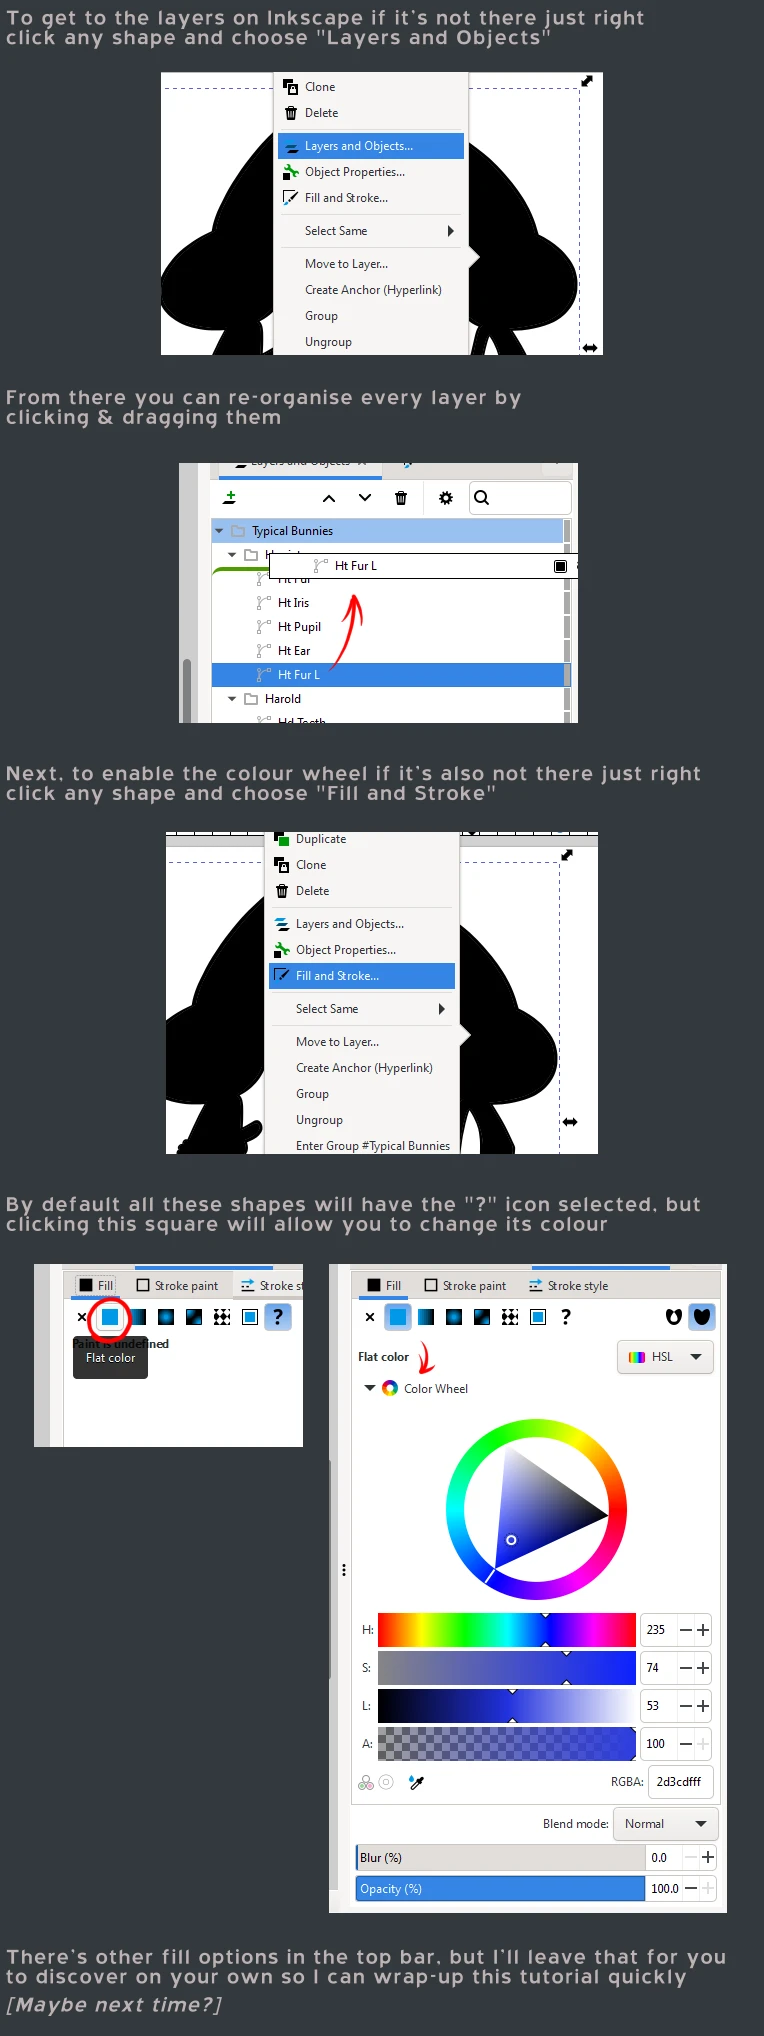
To begin, click on the Node Editor and let's start deleting those dots
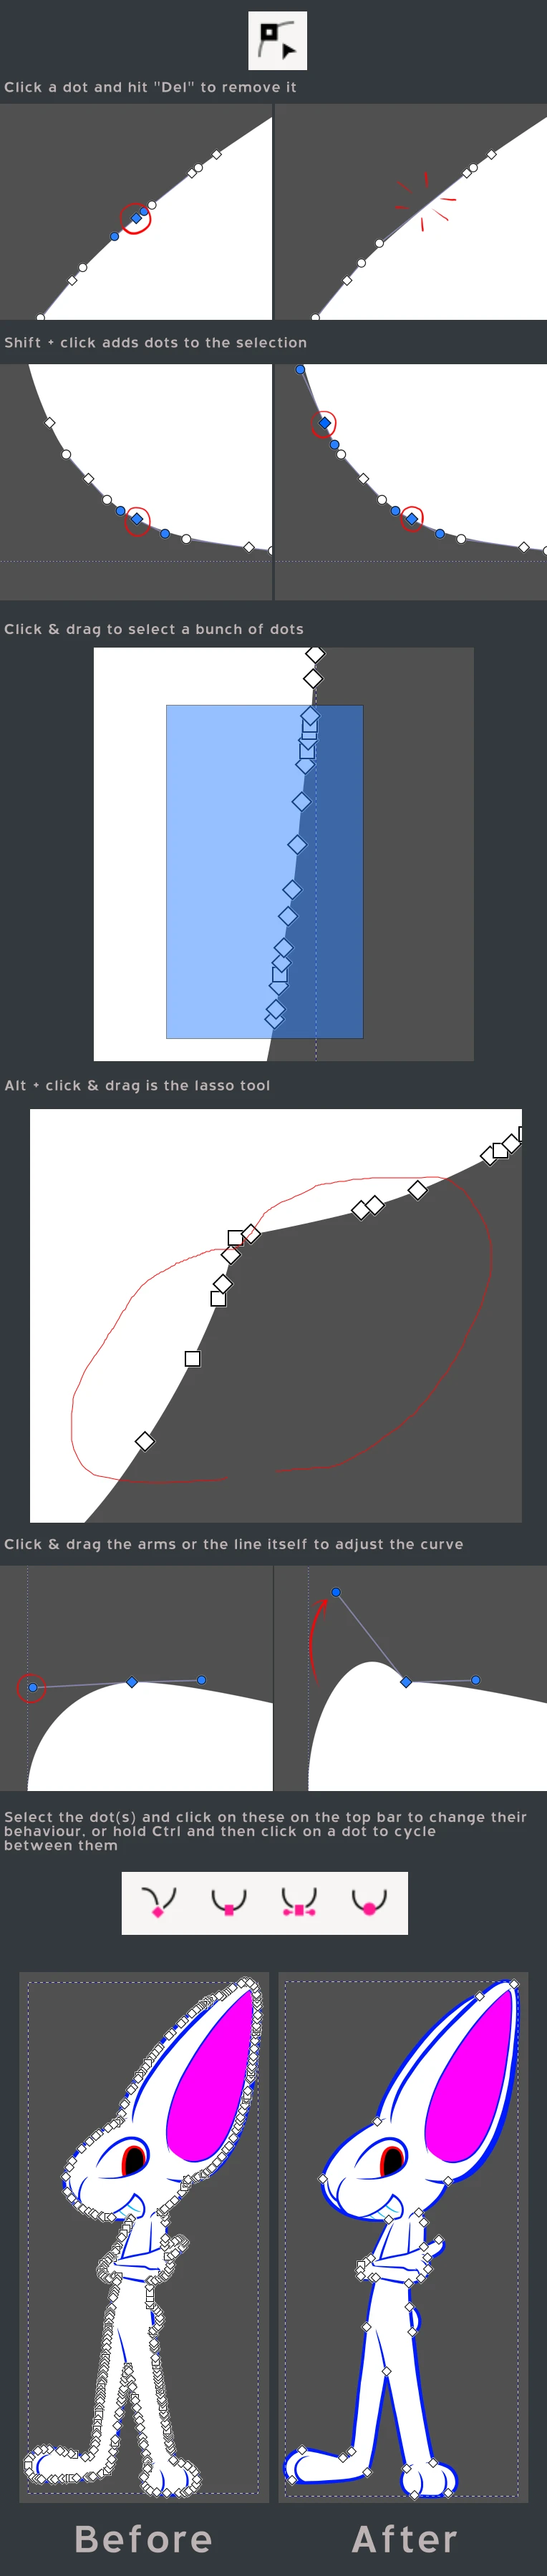
And there you have it! So much cleaner looking isn't it? I also find it much easier to remove dots than to add them manually.
Lastly, for the final step that I like to do: adding the shading!
You could do this in the Krita phase, quite easily too, but I prefer doing it here because it's simple enough to do
My favourite way to do it is by using the weirdly named "Pen Tool"
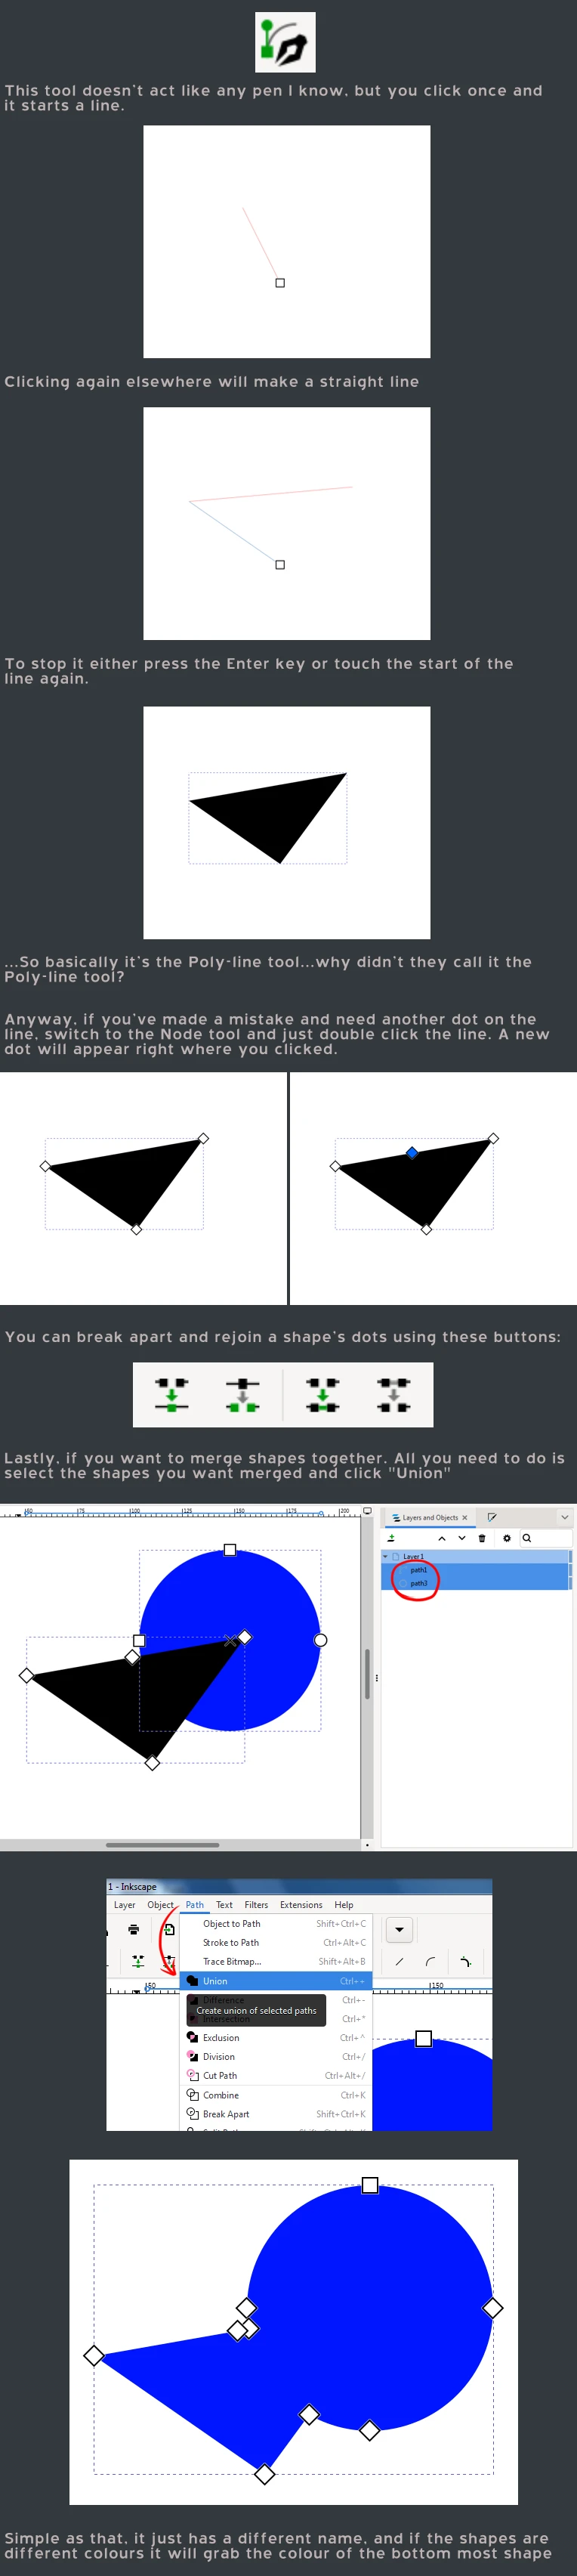
And there you have it! Now you know how to quickly create a vector image, AND learned the basics of Inkscape and its funky UI!
Here's my completed drawing for those interested.

It does use some more advanced stuff like clones, clipping masks, and filters, but for as much as I want to show off all that stuff I don't want this tutorial to go on any longer.
[I'm already out of image slots as is, and that's with all these workarounds]
Hope you learned something about vectors and how I do most of my bigger projects